This is part two of my post on getting a web application up and running on Google AppEngine with Maven, Jersey and Guice.
Part 2 gets us to the point of having a working web application running locally and deployed on AppEngine. If you haven’t got maven or your working directory set up yet, start on Part 1.
Don’t follow the Google docs
This is one not to follow along, but helps explain why this tutorial is needed. To begin, I decided to try following the AppEngine docs on user maven.
Let’s try their command:1
2
3
4
5
6
7
8mbp:listerly$ mvn archetype:generate \
> -DarchetypeGroupId=com.google.appengine.archetypes \
> -DarchetypeArtifactId=appengine-skeleton-archetype \
> -DarchetypeVersion=1.9.0 \
> -DgroupId=com.listerly.server \
> -DartifactId=server \
> -Dversion=0.1 \
> -Dpackage=com.listerly
I saw lots of nice maven messages about downloading everything under the sun, and then a hostile failure message.1
2
3
4
5
6
7
8
9
10[INFO] Archetype repository missing. Using the one from [com.google.appengine.archetypes:appengine-skeleton-archetype:1.8.7] found in catalog remote
Downloading: http://repo.maven.apache.org/maven2/com/google/appengine/archetypes/appengine-skeleton-archetype/1.9.0/appengine-skeleton-archetype-1.9.0.jar
[INFO] ------------------------------------------------------------------------
[INFO] BUILD FAILURE
[INFO] ------------------------------------------------------------------------
[INFO] Total time: 13.591 s
[INFO] Finished at: 2014-03-14T11:39:14+00:00
[INFO] Final Memory: 13M/246M
[INFO] ------------------------------------------------------------------------
[ERROR] Failed to execute goal org.apache.maven.plugins:maven-archetype-plugin:2.2:generate (default-cli) on project standalone-pom: The desired archetype does not exist (com.google.appengine.archetypes:appengine-skeleton-archetype:1.9.0) -> [Help 1]
Thanks very much for that. That doc was updated (when I loaded it) on March 7 2014, so it’s 7 days old. And doesn’t work. Too new to be out of date, too old to have teething problems.
A quick search of Maven Central reveals the likely issue - the latest version of this archetype that’s been published is 1.8.7. Looks like someone’s been forgetting to push the archetypes to the Maven Central repo for versions 1.8.8, 1.8.9 and 1.9.0. Two options to proceed: either start using the previous archetype and update. Or start from a cleaner archetype and add in the AppEngine functionality. I’m going to proceed with both options: you can pick and choose the one you prefer.
Starting from the AppEngine skeleton archetype
Lets first create a branch to work from:1
2
3
4
5
6
7
8
9
10
11
12
13
14
15
16
17
18
19
20mbp:listerly$ git checkout -b feature_gaeSkeletonArchetype
Switched to a new branch 'feature_gaeSkeletonArchetype'
mbp:listerly$ cat README.md
listerly
========
mbp:listerly$ echo "Branch for appengine skeleton archetype" > branch.txt
mbp:listerly$ git add .
mbp:listerly$ git commit -m "Branch message added."
[feature_gaeSkeletonArchetype 1ca1c52] Branch message added.
1 file changed, 1 insertion(+)
create mode 100644 branch.txt
mbp:listerly$ git push -u origin feature_gaeSkeletonArchetype
Counting objects: 4, done.
Delta compression using up to 8 threads.
Compressing objects: 100% (2/2), done.
Writing objects: 100% (3/3), 325 bytes | 0 bytes/s, done.
Total 3 (delta 0), reused 0 (delta 0)
To https://github.com/akshayrangnekar/listerly.git
* [new branch] feature_gaeSkeletonArchetype -> feature_gaeSkeletonArchetype
Branch feature_gaeSkeletonArchetype set up to track remote branch feature_gaeSkeletonArchetype from origin.
Now we try re-running the maven archetype:1
2
3
4
5
6
7
8
9
10
11
12mbp:listerly$ mvn archetype:generate -DarchetypeGroupId=com.google.appengine.archetypes -DarchetypeArtifactId=appengine-skeleton-archetype -DarchetypeVersion=1.8.7 -DgroupId=com.listerly.server -DartifactId=server -Dversion=0.1 -Dpackage=com.listerly
[INFO] Scanning for projects...
[INFO]
[INFO] Using the builder org.apache.maven.lifecycle.internal.builder.singlethreaded.SingleThreadedBuilder with a thread count of 1
[LINES REMOVED]
[INFO] ------------------------------------------------------------------------
[INFO] BUILD SUCCESS
[INFO] ------------------------------------------------------------------------
[INFO] Total time: 6.159 s
[INFO] Finished at: 2014-03-14T13:14:45+00:00
[INFO] Final Memory: 14M/246M
[INFO] ------------------------------------------------------------------------
That’s a lot better. Lets see what we have created for us. Using a handy little command I found here, modified to get rid of gitcrud to make this viewable1
2
3
4
5
6
7
8
9
10
11
12
13
14
15
16
17
18
19
20
21
22
23
24
25
26
27
28mbp:listerly$ find . -print | grep -v '.git' | sed -e 's;[^/]*/;|____;g;s;____|; |;g'
.
|____branch.txt
|____README.md
|____server
| |____pom.xml
| |____README.md
| |____server-ear
| | |____pom.xml
| | |____src
| | | |____main
| | | | |____application
| | | | | |____META-INF
| | | | | | |____appengine-application.xml
| | | | | | |____application.xml
| | | | | | |____MANIFEST.MF
| |____server-war
| | |____pom.xml
| | |____src
| | | |____main
| | | | |____java
| | | | |____webapp
| | | | | |____WEB-INF
| | | | | | |____appengine-web.xml
| | | | | | |____logging.properties
| | | | | | |____web.xml
| | | |____test
| | | | |____java
Ok - let’s try running this:1
2
3
4
5
6
7
8
9
10
11
12
13
14
15
16
17
18
19
20
21
22
23
24mbp:listerly$ cd server
mbp:server$ mvn appengine:devserver
[INFO] Scanning for projects...
[INFO] ------------------------------------------------------------------------
[INFO] Reactor Build Order:
[INFO]
[INFO] server
[INFO] server-war
[INFO] server-ear
[REMOVED LINES]
[INFO] ------------------------------------------------------------------------
[INFO] Reactor Summary:
[INFO]
[INFO] server ............................................ FAILURE [ 16.241 s]
[INFO] server-war ........................................ SKIPPED
[INFO] server-ear ........................................ SKIPPED
[INFO] ------------------------------------------------------------------------
[INFO] BUILD FAILURE
[INFO] ------------------------------------------------------------------------
[INFO] Total time: 17.469 s
[INFO] Finished at: 2014-03-14T13:26:54+00:00
[INFO] Final Memory: 9M/246M
[INFO] ------------------------------------------------------------------------
[ERROR] Failed to execute goal com.google.appengine:appengine-maven-plugin:1.8.7:devserver (default-cli) on project server: The application directory does not exist : /Users/akshay/Dev/Listerly/listerly/server/target/server-0.1 -> [Help 1]
Not nice. Ok, let’s try again with some help from the appengine docs (though not following them to the letter since they are wrong about the directory to run from):1
2
3
4
5
6
7
8
9
10
11
12
13
14
15mbp:server akshay$ mvn clean install
[REMOVED LOTS OF LINES]
[INFO] ------------------------------------------------------------------------
[INFO] BUILD SUCCESS
[INFO] ------------------------------------------------------------------------
[INFO] Total time: 17.990 s
[INFO] Finished at: 2014-03-14T13:36:48+00:00
[INFO] Final Memory: 11M/246M
[INFO] ------------------------------------------------------------------------
mbp:server akshay$ mvn -pl server-ear appengine:devserver
[INFO] Scanning for projects...
[REMOVED LOTS OF LINES]
[INFO] INFO: The admin console is running at http://localhost:8080/_ah/admin
[INFO] Mar 14, 2014 1:40:02 PM com.google.appengine.tools.development.DevAppServerImpl doStart
[INFO] INFO: Dev App Server is now running
That looks good.
If we load up the admin console at http://localhost:8080/_ah/admin it seems right: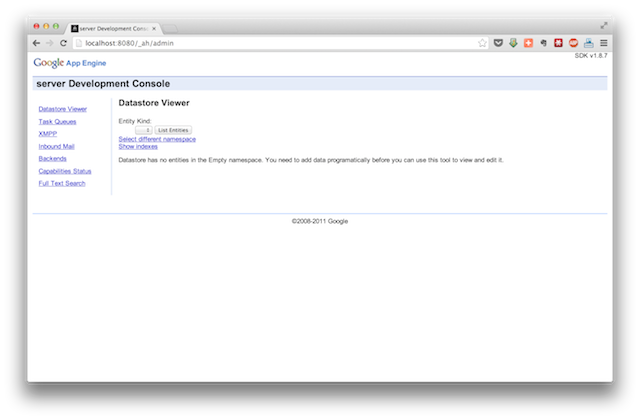
There is of course nothing there. So let’s create a very simple Servlet. Here’s my incredibly basic HelloWorldServlet:1
2
3
4
5
6
7
8
9
10
11
12
13
14
15
16
17
18
19package com.listerly;
import java.io.IOException;
import javax.servlet.http.HttpServlet;
import javax.servlet.annotation.WebServlet;
import javax.servlet.ServletException;
import javax.servlet.http.HttpServletRequest;
import javax.servlet.http.HttpServletResponse;
@WebServlet("/Hello")
public class HelloWorldServlet extends HttpServlet {
@Override
protected void doGet(HttpServletRequest req, HttpServletResponse resp)
throws ServletException, IOException {
resp.setContentType("text/plain");
resp.getWriter().println("Hello AppEngine!");
}
}
But if we try running it:1
mbp:server akshay$ mvn install
[INFO] Scanning for projects...
...
[INFO] -------------------------------------------------------------
[ERROR] COMPILATION ERROR :
[INFO] -------------------------------------------------------------
[ERROR] /Users/akshay/Dev/Listerly/listerly/server/server-war/src/main/java/com/listerly/HelloWorldServlet.java:[6,31] error: package javax.servlet.annotation does not exist
[ERROR] /Users/akshay/Dev/Listerly/listerly/server/server-war/src/main/java/com/listerly/HelloWorldServlet.java:[11,1] error: cannot find symbol
[ERROR]   symbol: class WebServlet
/Users/akshay/Dev/Listerly/listerly/server/server-war/src/main/java/com/listerly/HelloWorldServlet.java:[6,31] error: package javax.servlet.annotation does not exist
[ERROR] /Users/akshay/Dev/Listerly/listerly/server/server-war/src/main/java/com/listerly/HelloWorldServlet.java:[11,1] error: cannot find symbol
[INFO] 4 errors
Ass. So clearly the archetype doesn’t use the latest version of the Servlet API. Interestingly, I cannot find anything easily available in Google’s docs about what version of the Servlet API they support. Let’s try defining the servlet in the web.xml1
2
3
4
5
6
7
8
9<servlet>
<servlet-name>HelloWorldServlet</servlet-name>
<servlet-class>com.listerly.HelloWorldServlet</servlet-class>
</servlet>
<servlet-mapping>
<servlet-name>HelloWorldServlet</servlet-name>
<url-pattern>/hi</url-pattern>
</servlet-mapping>
and rerunning:1
2mbp:server akshay$ mvn install
mbp:server akshay$ mvn -pl server-ear appengine:devserver
and this time we get something better: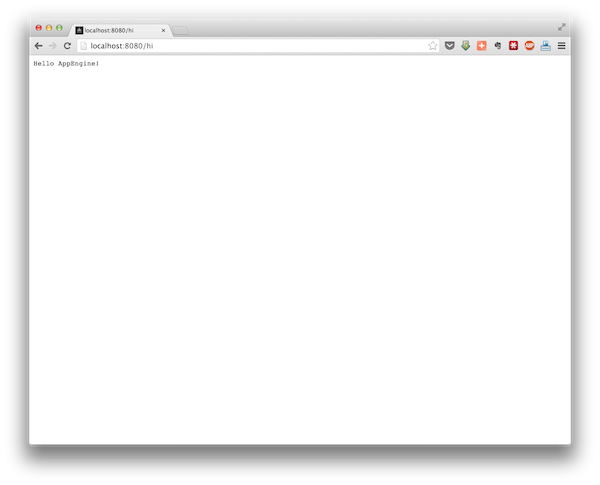
Awesome. We now have a servlet running on our local dev server. Looks like we can’t use the WebServlet annotation with the devserver though. Lets try pushing this app to appengine. First, there are a tweak to the configuration file. In appengine-web.xml set the application to the id of the project you created on the AppEngine console:
1 | <appengine-web-app xmlns="http://appengine.google.com/ns/1.0"> |
and in the appengine-application.xml do the same thing:1
2
3<appengine-application xmlns="http://appengine.google.com/ns/1.0">
<application>listerly-dev</application>
</appengine-application>
And then run the update tasks mvn -pl server-ear appengine:update. If all is well, you should first see a browser window pop up asking you for authentication: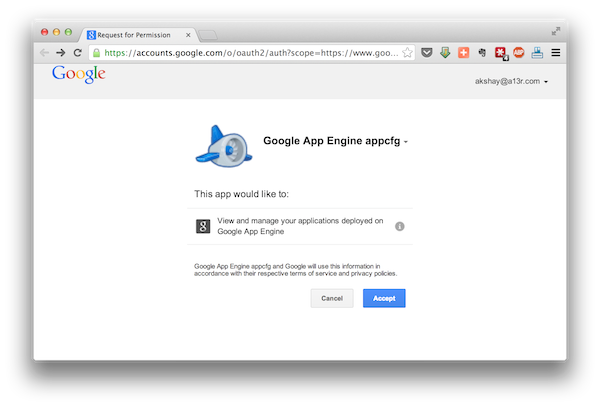

Enter that code when you get the prompt Please enter code:. If all is well you should see a BUILD SUCCESS message at the end of the compilation and deployment step (note: this takes a couple of minutes);
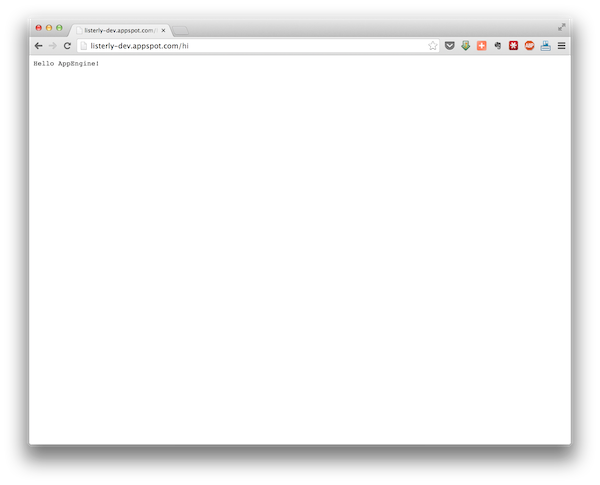
Load the page from your appspot URL http://[your-application-id].appspot.com/hi and you should see your Hello AppEngine page, running on Google AppEngine. That’s success for this part.
Lets commit everything and then switch back to the master to try the handrolled way.1
2
3
4
5
6
7
8
9
10
11
12mbp:~/Dev/Listerly/listerly$ git add .
[NON-ERROR OUTPUT HIDDEN]
mbp:~/Dev/Listerly/listerly$ git commit -m "Working HelloWorld with Google archetype"
[NON-ERROR OUTPUT HIDDEN]
mbp:~/Dev/Listerly/listerly$ git push
[NON-ERROR OUTPUT HIDDEN]
mbp:~/Dev/Listerly/listerly$ git checkout master
[NON-ERROR OUTPUT HIDDEN]
mbp:~/Dev/Listerly/listerly$ git pull
Already up-to-date.
mbp:~/Dev/Listerly/listerly$ ls
README.md server
Starting from scratch
I have to admit, this is my preferred way of starting because I like to have complete control over the project layout, the directory structure etc.
Let’s start with what my ideal directory structure is:
- [root directory] - Primarily contains build files
- src
- main
- java - The main directory for source code
- resources - Other items that have to go into the jar (logging config, application config)
- webapp - Resources (css, images, js)
- templates - Freemarker templates for pages
- test - Testing resources (will be defined later)
- main
- build - temporary directory, ignored by git, for artifacts
- src
Lets start by creating that directory structure (leave out the build directory - should be created automatically). Then we’ll make a basic Maven build file (named pom.xml in our root directory)
1 | <project xmlns="http://maven.apache.org/POM/4.0.0" xmlns:xsi="http://www.w3.org/2001/XMLSchema-instance" |
Then we add our basic servlet and a web.xml:
In src/main/java/com/listerly/1
2
3
4
5
6
7
8
9
10
11
12
13
14
15
16
17
18
19
20package com.listerly;
import java.io.IOException;
import javax.servlet.ServletException;
import javax.servlet.http.HttpServlet;
import javax.servlet.http.HttpServletRequest;
import javax.servlet.http.HttpServletResponse;
@SuppressWarnings("serial")
public class HelloWorldServlet extends HttpServlet {
@Override
protected void doGet(HttpServletRequest req, HttpServletResponse resp)
throws ServletException, IOException {
resp.setContentType("text/plain");
resp.getWriter().println("Hello, my AppEngine");
}
}
In src/main/webapp/WEB-INF1
2
3
4
5
6
7
8
9
10
11
12
13
14
15
16
17<?xml version="1.0" encoding="UTF-8"?>
<web-app version="2.5" xmlns="http://java.sun.com/xml/ns/javaee"
xmlns:xsi="http://www.w3.org/2001/XMLSchema-instance"
xsi:schemaLocation="http://java.sun.com/xml/ns/javaee http://java.sun.com/xml/ns/javaee/web-app_2_5.xsd">
<welcome-file-list>
<welcome-file>index.html</welcome-file>
</welcome-file-list>
<servlet>
    <servlet-name>HelloWorldServlet</servlet-name>
    <servlet-class>com.listerly.HelloWorldServlet</servlet-class>
</servlet>

<servlet-mapping>
    <servlet-name>HelloWorldServlet</servlet-name>
    <url-pattern>/hi</url-pattern>
</servlet-mapping>
</web-app>
Lets try building our war file:1
mbp:~/Dev/Listerly/listerly$ mvn package
[BLAH BLAH BLAH...]
[INFO] ------------------------------------------------------------------------
[INFO] BUILD SUCCESS
[INFO] ------------------------------------------------------------------------
Good so far. But there’s not much we can do with this just yet. Let’s first start with trying to run our war on a web server independently of AppEngine.
Lets add the Jetty plugin to our pom.xml:1
2
3
4
5
6
7
8
9<build>
<plugins>
<plugin>
<groupId>org.eclipse.jetty</groupId>
<artifactId>jetty-maven-plugin</artifactId>
<version>9.1.3.v20140225</version>
</plugin>
</plugins>
</build>
Now try running the mvn jetty:run task1
mbp:~/Dev/Listerly/listerly$ mvn package
[BLAH BLAH BLAH...]
mbp:~/Dev/Listerly/listerly$ mvn jetty:run
[BLAH BLAH BLAH...]
[INFO] Started Jetty Server
If you try accessing your servlet at localhost:8080/hi you should see a positive result: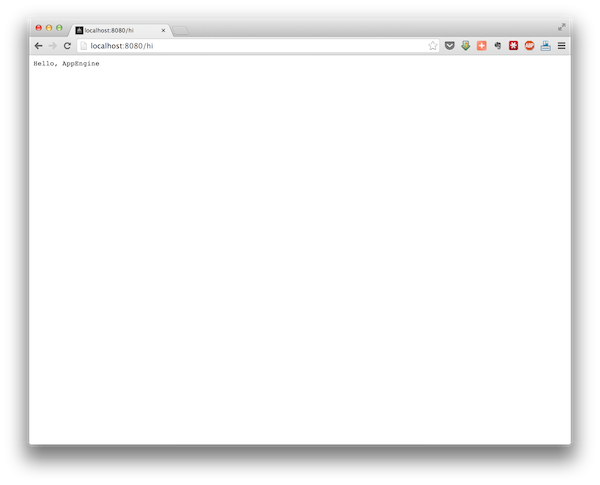
Ok, lets move on to integrating appengine.
Before we start, I’m going to change my servlet a tiny bit just to be able to differentiate and make sure this is the version we’re seeing. Change the appropriate line to resp.getWriter().println("Hello, handrolled AppEngine!");
Next, we need to create the appengine-web.xml (in src/main/webapp/WEB-INF/) that tells AppEngine what project and version1
2
3
4
5
6<?xml version="1.0" encoding="utf-8"?>
<appengine-web-app xmlns="http://appengine.google.com/ns/1.0">
<application>listerly-dev</application>
<version>1</version>
<threadsafe>true</threadsafe>
</appengine-web-app>
Then we need to add a couple of items to our pom.xml1
2
3
4
5
6
7
8
9
10
11
12
13
14
15
16
17
18
19
20
21
22
23
24
25
26
27
28
29
30
31
32
33
34
35
36
37
38
39<project xmlns="http://maven.apache.org/POM/4.0.0" xmlns:xsi="http://www.w3.org/2001/XMLSchema-instance"
xsi:schemaLocation="http://maven.apache.org/POM/4.0.0 http://maven.apache.org/xsd/maven-4.0.0.xsd">
<modelVersion>4.0.0</modelVersion>
<groupId>com.listerly</groupId>
<artifactId>listerly-server</artifactId>
<version>0.1</version>
<packaging>war</packaging>
<name>Listerly Main Server</name>
<url>http://www.listerly.com</url>
<dependencies>
<dependency>
<groupId>com.google.appengine</groupId>
<artifactId>appengine-api-1.0-sdk</artifactId>
<version>1.9.0</version>
</dependency>
<dependency>
<groupId>javax.servlet</groupId>
<artifactId>servlet-api</artifactId>
<version>2.5</version>
</dependency>
</dependencies>
<build>
<plugins>
<plugin>
<groupId>org.eclipse.jetty</groupId>
<artifactId>jetty-maven-plugin</artifactId>
<version>9.1.3.v20140225</version>
</plugin>
<plugin>
<groupId>com.google.appengine</groupId>
<artifactId>appengine-maven-plugin</artifactId>
<version>1.8.7</version>
</plugin>
</plugins>
</build>
</project>
Now if we run mvn appengine:devserver and visit http://localhost:8080/hi we get something that looks good:
Lets try pushing it to the Google servers. Run mvn appengine:update and if all goes well (it should!), open a browser to http://[app-id].appspot.com/hi. Uh oh. Doesn’t say “handrolled” for me. Looks like it’s still running the old version. Fortunately, this is to be expected because AppEngine allows you to upload multiple versions of your app, but only one of them is the “default version”. Lets make this version default. Visit appengine.google.com. Login, and then click on your application. In the left navigation bar you should see “versions”. Click there, and you’ll see that you have two versions deployed: 1-war that was created by the AppEngine archetype, and 1, which is the version we just created. Select 1, and click make default. Now if you reload your other browser window, you should see “Hello, handrolled AppEngine!”. That’s success for Part 2.
You can choose which approach you prefer. I like the ability to have full control over my project structure so for the rest of this tutorial I’m going to go with the second approach (which the more attentive may have guessed by the fact that this has all been done on the master branch though I claim that was accidental). Add everything into git (if you’re going with this approach - otherwise discard everything and merge the other branch into master) and we’ll be ready to go with Part 3.